

In most cases the seal is not the problem. The retainer is. That aluminum channel along the bottom of the door holds the seal by gripping two beads or a T-shaped ridge, and once the channel has spread open, corroded, or been fitted with the wrong seal profile, nothing you slide into it will stay. The second most common cause is a simple size mismatch, since a seal that is narrower than the retainer has nothing to grip. Before buying another seal, check the retainer and match the profile to it. That one step prevents most repeat failures.
Key takeaways
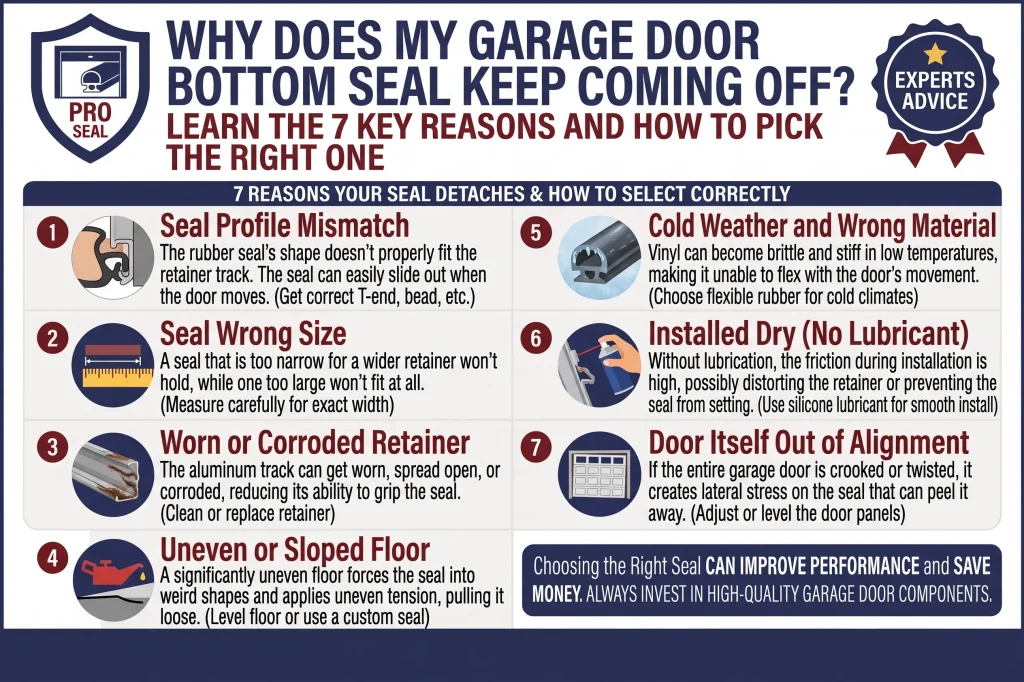
- The retainer is the part that holds the seal. If it has spread open, a new seal will walk out too.
- Profile matters more than brand: T-style fits T-style retainers, bead fits bead retainers, and they do not interchange.
- Measure the retainer channel before ordering. Seal width is not the same as door width.
- Cold makes it worse. Vinyl stiffens and contracts in winter, which is when most seals let go.
- EPDM rubber stays flexible in cold. Vinyl is cheaper and less forgiving in an Ohio winter.
- Never remove the bottom brackets to install a seal. They are attached to the lift cables under full spring tension.
- A seal that will not seat evenly is often telling you the door or the floor is out of level, not that the seal is wrong.
1. The seal profile does not match the retainer
Why the wrong bottom seal profile keeps sliding out
This is the first thing to check and the most common reason for a repeat failure. Retainers come in a few designs and each one grips a specific seal shape. A T-style retainer has two channels that capture the T-shaped ridges molded into the seal. A bead or bulb retainer holds round beads instead. There are also single-channel retainers that take a completely different profile.
If you push a bead seal into a T-style retainer, it will go in and it will look fine. It has almost nothing holding it, so the first cold morning or the first time the door catches on ice, it slides out one end.
The fix is to look at the retainer channel end-on before you order. Take a photo of the opening from the side of the door so you can compare it against product listings. If the retainer has two opposing slots facing each other, you need T-style. If it has round pockets, you need bead. Match the shape rather than trusting a listing that claims universal fit.
2. The seal is the wrong size for the retainer
How to measure a garage door bottom seal correctly
Size mismatch runs a close second. Seals are sold by width, and that width refers to the flattened dimension of the seal, not the width of the door. A seal too narrow for its channel has insufficient bead engagement and pulls free under its own weight over time. A seal too wide fights its way in, deforms, and puts constant outward pressure on the retainer, which contributes directly to the next problem on this list.
Measure the retainer channel opening and the depth of the pocket, then buy to those numbers. Buy the length generously, since seal is trimmed to fit and running short at the last foot is a frustrating way to end the job.
Worth doing at the same time: check the gap between the closed door and the floor at both ends and in the middle. A gap that varies by more than an inch across the width means the seal is being asked to fill an uneven space, which no amount of correct sizing solves on its own.
3. The retainer is worn, spread, or corroded
Why a bad garage door bottom seal retainer ruins every new seal
Aluminum retainers are soft. Years of seal insertion, ice buildup, and impacts from the door meeting the floor gradually spread the channel open, and once the opening is wider than the bead it is supposed to capture, the grip is gone permanently. Road salt accelerates the same process by corroding the aluminum from the inside of the channel.
The tell is easy: install a correctly sized seal, close the door, and see whether it stays for a week. If a properly matched seal walks out again, the retainer is finished. You can sometimes squeeze a spread channel back with pliers, but the aluminum has already yielded and it will open again.
Replacing the retainer is a bigger job than replacing the seal, because the retainer is riveted or screwed to the bottom section and often has to be cut away. Budget for it as a real repair rather than a quick swap. Skipping the retainer and buying a third seal is exactly the kind of false economy described in Do Garage Door Repair Parts Really Matter? 10 Parts That Decide How Long the Fix Lasts, where the cheap part and the durable repair are rarely the same purchase.
Call a technician if the bottom section itself is rusted through where the retainer mounts. There is nothing left to hold a fastener at that point, and the conversation shifts to a section repair or a garage door replacement. 5 signs you should replace your garage door covers when that math tips over.
4. An uneven or sloped concrete floor
Why a garage door seal will not seal on an uneven floor
Concrete settles, cracks, and slopes for drainage. When the floor is not level across the opening, a standard seal compresses hard at the high point and never touches at the low point. The compressed section wears through fast, and the constant uneven pressure works the seal out of the retainer at whichever end is taking the load.
You can measure this in a minute. Close the door and slide a tape measure or a piece of card under it at both jambs and at the center. A variation of half an inch is normal and a good seal absorbs it. Two inches is a floor problem, not a seal problem.
The usual answer is a taller bulb seal that can compress further, or a threshold seal bonded to the concrete that meets the door seal partway. Threshold seals work well in the Dayton area for the additional reason that they keep meltwater and salt slush from running in under the door.
5. Cold weather and the wrong material
How Ohio winters pull garage door seals out of the retainer
Most seals let go between December and February, and material is why. Vinyl is inexpensive and it is the standard cheap option, but it stiffens and contracts as temperatures drop. A vinyl seal cut to an exact fit in July can shrink enough by January to pull its ends out of the retainer entirely. Once stiff, it also stops conforming to the floor, so the door starts leaving a visible gap in exactly the season you need it closed.
EPDM rubber stays flexible in the cold and does not contract the same way. It costs more per foot and it is the better buy anywhere that sees real winter.
Two installation habits help regardless of material. Leave a small amount of extra length at each end rather than cutting flush, so contraction has somewhere to go. And install on a warm day, or warm the seal in the sun first, since a seal fitted while stiff is a seal fitted under stress.
Frozen seals cause a second problem that costs more than the seal does. When water collects in a poorly seated seal and freezes, it bonds the door to the concrete. The opener then tries to lift a door that is stuck to the floor, and the drive gear absorbs the whole stall. That is one of the causes covered in Why Do Garage Door Opener Gears Strip? 6 Causes and What to Replace Them With. If the door is frozen down, break it loose or lift by hand rather than holding the button.
6. Installed dry, or installed without lubricant
Why sliding a bottom seal in without lubricant causes it to fail early
Threading a seal through a retainer channel takes real force, and doing it dry has two consequences. The seal stretches as you pull it, which means it is under tension for the entire time it sits in the channel and slowly retracts toward whichever end is looser. Dry installation also tends to nick or tear the beads, and a torn bead has nothing left to grip with.
A light soapy water solution on the beads is the standard trick. The seal slides through with far less pulling, which means it goes in at its natural length instead of stretched. Do not use petroleum products, since they degrade rubber over time.
Small detail that saves a callback: check whether the seal is retracting after a week. If both ends have crept inward from where you trimmed them, it went in stretched and it will keep pulling until it exits the channel.
7. The door itself is out of alignment
How a misaligned garage door destroys the bottom seal
If the door does not sit square in the opening, the bottom section meets the floor at an angle and the seal takes all its wear at one corner. Replacing the seal without correcting the alignment resets the clock on the same failure.
Track and roller problems are the common cause. Seized rollers pull the door out of square on every cycle, and the material and bearing choice affects how quickly that happens, which we covered in Are Nylon Garage Door Rollers Better Than Steel? 7 Differences That Actually Matter. If the door is visibly crooked or catches in the track, start with garage door off track: top causes and fixes and the early indicators in garage door off track warning signs.
Springs matter here too. A door with weak or broken springs drops the last few inches instead of settling, and that repeated impact flattens the seal and hammers the retainer. If the door slams down rather than closing gently, check signs your garage door springs need replacement before touching the seal.
Stop using the door and call a technician if a spring has broken or the door has left the track. Is a broken garage door spring safe to use and is a garage door off track safe to use explain why neither is a wait-and-see situation, and off track: DIY or call a pro covers where the line falls. On a commercial building, a prompt broken garage door spring repair prevents the slam damage from spreading to the bottom section.
How to pick the right garage door bottom seal
Comparing garage door bottom seal types and materials
| Seal type | How it attaches | Best for | Watch out for |
| T-style (single or double) | T-shaped ridges slide into matching retainer channels | Most modern steel doors with aluminum retainers | Must match the retainer exactly. Single and double T are not interchangeable. |
| Bead or bulb | Round beads captured in pocket-style retainer | Doors with bead-type retainers, and uneven floors | Higher profile can catch on rough concrete |
| U-shape or J-type | Slides into a single-channel retainer | Older doors and some commercial units | Fewer replacement options available off the shelf |
| Nail-on rubber | Fastened directly to a wooden bottom rail | Wood doors with no retainer | Not compatible with steel doors. Fasteners work loose over time. |
| Threshold seal | Adhered to the concrete, meets the door seal | Sloped floors, water intrusion, driving rain | Can trap debris. Needs a clean, dry slab to bond properly. |
| Material | Cold weather | Lifespan | Cost |
| Vinyl | Stiffens and contracts | Shortest | Lowest |
| EPDM rubber | Stays flexible | Longest | Higher |
| TPE blends | Good | Middle | Middle |
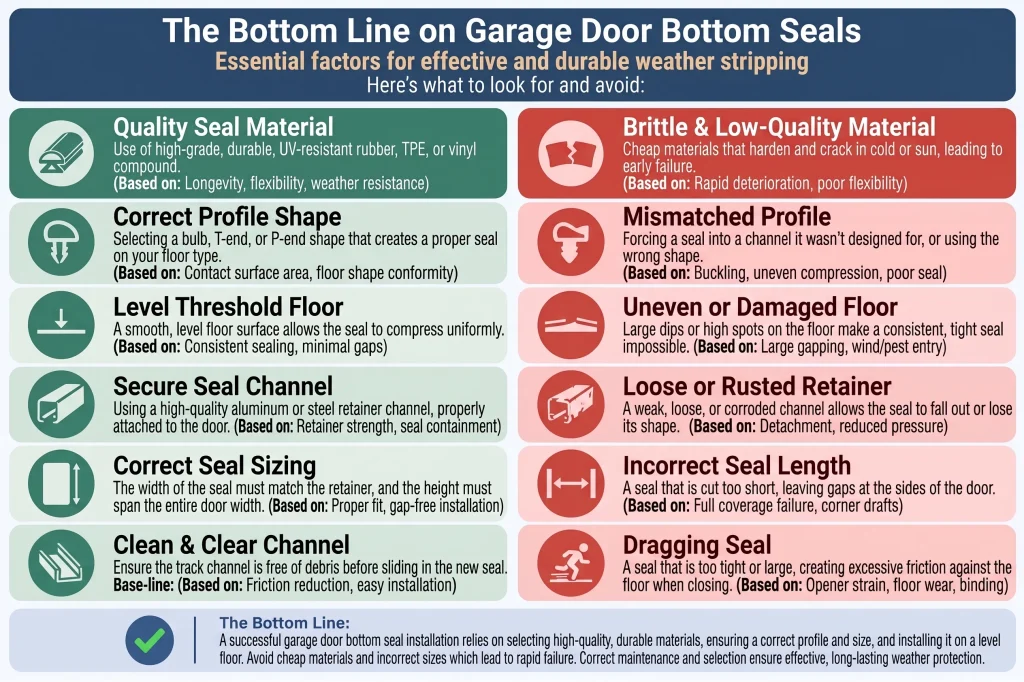
The short version: match the profile to the retainer, measure rather than guess, and choose EPDM if the garage is attached or you want it to survive more than a couple of winters.
What you can do yourself
Is replacing a garage door bottom seal a DIY job
Replacing the seal itself is one of the more approachable garage door repairs. Open the door partway so you can reach the retainer, slide the old seal out from one end, clean the channel of grit and old debris, then feed the new seal in with soapy water on the beads. Work from one end and keep steady tension rather than yanking.
The hard limit is the bottom brackets. Those sit at each end of the bottom section, and they are attached to the lift cables, which carry full spring tension whenever the door is down. A seal replacement never requires removing them. If a video tells you to take the brackets off, close the video. The reasoning is the same as in garage door springs replacement, DIY vs hire a pro.
Call a technician if the retainer needs replacing, if the bottom section is rusted or cracked, or if the door will not close evenly after the new seal is in. And once the seal is on, re-run the reversal test, since a thicker seal can change where the door makes contact and throw off the down limit. How to test your garage door safety features at home walks through it, how to fix common garage door safety issues covers the adjustments, and garage door safety warning signs covers what a door that no longer reverses properly is telling you.
The bottom line on garage door bottom seals
How to stop replacing the same garage door seal every year
If you have replaced the seal more than once, stop buying seals and inspect the retainer. A spread or corroded channel cannot hold anything, and a third seal will leave the same way the first two did. When the retainer is sound, match the profile, measure the channel, choose a material that suits the winter, and install it with lubricant and a little slack at the ends.
Be wary of anyone who inspects a loose seal and pivots straight to a full door quote. A seal and even a retainer are modest repairs on a sound door. That kind of jump is a pattern the International Door Association has publicly warned homeowners about, and its checklist for vetting a garage door company is a useful thing to read before booking. Clopay covers the same ground from the manufacturer side in its guidance on questions to ask before hiring a garage door contractor. If the bottom section really is beyond saving, a properly scoped garage door installation at least gets the retainer and seal specified correctly from day one.
Serving Dayton, Beavercreek, Centerville, Fairborn, Bellbrook, Cedarville, and Jamestown, Dodson Garage Door checks the retainer and the floor before quoting a seal, on residential doors and on commercial garage door repair alike.
Daylight under your door or water getting in? Request a free quote and same-day service.
Frequently asked questions
2. How do I know whether I need a T-style or bead seal?
Look at the end of the retainer channel with the door partway open. Two opposing slots facing each other means T-style. Round pockets mean bead. Photograph it and compare against the product listing rather than trusting a universal fit claim, because universal fit is the most common reason people end up buying two seals.
3. Can I replace the bottom seal myself?
Yes, and this is one of the repairs we are happy to talk homeowners through. Slide the old one out, clean the channel, and feed the new one in with soapy water on the beads. The rule that is not negotiable is leaving the bottom brackets alone, because they are attached to the lift cables under spring tension. A seal replacement never requires touching them.
4. Why is there still a gap after I installed a new seal?
Usually the floor rather than the seal. Concrete settles and slopes, so the door meets a surface that is not level, and a standard seal cannot fill a gap that varies by more than an inch or so across the opening. The fix is either a taller bulb seal or a threshold seal bonded to the slab.
5. What is the difference between a bottom seal and a threshold seal?
The bottom seal is attached to the door and travels with it. The threshold seal is bonded to the concrete and stays put. They are not alternatives so much as partners, and on a sloped floor or a garage that takes driving rain, running both is the arrangement that actually keeps water out.
6. Will a new seal keep mice out of my garage?
It helps considerably and it is one of the more common reasons people call us about a seal in the fall. A good seal closes the gap that rodents use, though it will not compensate for gaps around the jambs or a damaged bottom section. Seal the door and check the perimeter at the same time.
7. Why does my seal keep coming out at one end only?
Two usual causes. The seal was installed stretched, so it is retracting toward the looser end, which is what soapy water during installation prevents. Or the door is sitting out of square and loading one corner harder than the other. If it is always the same end, look at the door alignment rather than buying another seal.
8. Is vinyl or rubber better for a bottom seal?
For this climate we steer people to EPDM rubber. Vinyl stiffens and contracts in the cold, which is precisely when the seal is doing its most important work, and it is the material behind most of the midwinter failures we get called out for. Vinyl is fine in a mild climate or a detached garage where a gap is not a real concern.
9. Can I just add a second seal on top of the old one?
We would not. Doubling up changes where the door makes contact with the floor, which can throw off the opener's down limit and stop the door from reversing correctly on an obstruction. Any change at the bottom of the door means the safety reversal should be retested afterward.
10. My seal is fine but water still comes in. What else should I check?
Look at where the water is actually entering, because the bottom seal gets blamed for a lot of leaks it did not cause. Common culprits are the jamb weatherstripping on the sides, a driveway that slopes toward the garage instead of away, and the gap where the floor slab meets the door opening. If water is pooling outside the door before it comes in, no seal alone will hold it back.